Showing posts with label window decoration. Show all posts

Friday, 21 December 2012

Paper snowflake pattern round up


Just in case you wanted to do some last minute decorating I thought I'd share some of the lovely paper snowflake craft I have found on Pinterest.

Did you know that most of the super pretty snowflakes are folded in six rather than four:
How to fold by All for the boys

But you don't need to come up with your own designs because all of the following links supply one or more template:


And here is one awesome way to display them
Snowflake curtain by Bugs and Fishes

Wednesday, 18 April 2012

Rainbow window painting

(Goblin is 30 months)
I had been photographing stuff by the window using the flip chart as a white background. Goblin saw the paper and wanted to do some painting. I laid the mat out in the middle of the room where we usually paint but he insisted he wanted to stay by the window. So I brought the mat to the window.
 He did some lovely tractor tyre painting - his favourite painting accoutrement at the moment.
But then he started painting on the window. I was going to tell him to stop, but I try to live the mantra "Say 'Yes' to your child as often as possible". Unless I think that Goblin is about to skewer himself on something spiky I try and say Yes when ever I can - even when that means a bit more cleaning up for me.
I know that some of my friends think I am barking mad when I let Goblin run through a muddy puddle and cake his shoes in gooey mud just before we get in the car. But the joy that he gets from that little bit of extra freedom is priceless. If you have time you should check out The Mommies Made Me Do It. She has a fantastic "Yes album" which shows pictures of all the things she has allowed her son to do when her first instinct was to say 'No' and she caught herself quick enough and switched it to Yes. She describes herself as "a recovering "No!" Mom with Helicopter tendencies". I love it.
I'm so glad I didn't stop him because look how beautiful the painting turned out to be. He's using a ridged roller and it made the painting look like a rainbow.
As always Goblin decided that it wasn't enough to use the brushes, tractor and roller. He also used his hands and feet. And in the photo below it looks like he may have used his mouth!

 I'm linking this to
Fun Stuff Fridays


Monday, 24 October 2011

Rainy Day Activities - Part 2: Foam pictures

(Goblin is 24 months)
Our holiday home doesn't have much in the way of craft supplies but fortunately while in Tesco yesterday I popped some foam sheets in the trolley. They were about 15 sheets for 99p. I couldn't find the Tesco brand online but you can pick them up in Hobby craft.
In case you didn't know, foam sheeting when wet will stick to windows. Last night I sat in front of the TV and cut out animal shapes. 
This morning when Goblin was looking for something to do I presented him with these animals and a bowl of water and popped them down in front of one of the big patio doors. Goblin was really excited. He went through and named all the animals. I was quite chuffed that he recognised them from my dodgy freehand cut outs. 
I realised after he'd been playing with them for a while that I had some counting opportunities. There was 1 snake; 2 pigs; 3 horses; 4 chickens; 5 ducks.
If I hadn't been distracted by watching The West Wing, I might have thought about the counting opportunities and carried on with increasing numbers of animals. But instead I made 1 pond; 2 tractors; 2 cats; 2 clouds; 3 bits of grass; 1 sun; and 1 moon. Maybe I'll do some more tonight. 
Even Hublet seemed to like playing with them. 


Friday, 21 October 2011

Autumn leaves

(Goblin is 24 months)
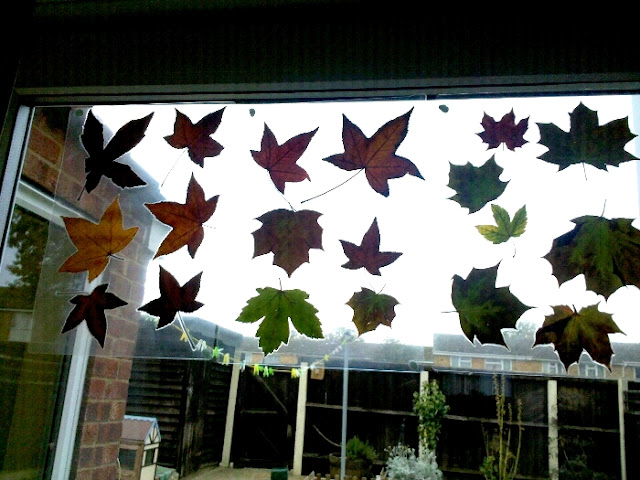
I have been collecting leaves because they are so pretty this time of year. I often collect leaves and press them but I'm usually at a bit of a loss as to what to do with them. I found an excellent post on Sun Hats and Wellie boots with loads of ideas of things to do with autumn leaves. I instantly pinched the idea of laminating them so they last longer.  
For the time being I am just using them as a window decoration, but when I get bored of having them there I will cut them up and use them as counters, or for size and colour sorting. 
It turns out I wasn't the only one collecting leaves. When my mum came to visit for Goblin's birthday she brought some amazing vine leaves in beautiful colours. And she brought with her an idea of how to use them. She said she'd seen a little girl in a buggy wearing a crown and as she got closer she saw it was made of autumn leaves. 
Vine leaves are quite floppy, so I pressed them in a heavy book and then hit the laminator. I stuck the leaves to the sugar paper band using double sided tape. The result is fantastic. Another addition to our growing dressing up box of hats. 
I'm going to share this idea on the It's Playtime community, every toddler needs a crown!
It's Playtime at hands on : as we grow 

Thursday, 13 October 2011

Halloween Stain glass window decorations

(Goblin is 24 months)
When you find something that works exploit it I say. Goblin loved ripping up tissue paper when we made our paper mache bowls so I thought what else can we do with tissue paper? 
 I know its a bit early for halloween but I thought I'd make some halloween decorations. I got Goblin to rip up more tissue paper. I laid one sheet of pale coloured tissue paper on a plastic mat and covered it in a mix of PVA glue and water. Then Goblin and I stuck more strips of tissue paper on top, painting over them with the PVA mixture as we went. We only did one or two layers deep. We did one all orange, yellow and red, and the other mixed colours. 
The great thing about this is it doesn't have to be neat, in fact the messier the better.  
We left the tissue paper to dry overnight. It dries very fast and once dry will peal away from the plastic mat with ease. But if you don't have a plastic mat you can cover a tray with cling-film and use that as the base. 

 I drew an outline of a silhouette on some black card, and used a craft knife to cut it out. You can use scissors but then you need to poke holes in the middle to get round the inside. 
 I stuck the silhouette on the tissue paper and cut round that too. 
 And there you have it - Halloween stain glass window decorations. 


Saturday, 1 October 2011

Waldorf Window decoration

(Goblin is 23 months)
We have just had new windows fitted and they let in so much more light. I have been reading a lot of home ed blogs recently that are Waldorf - Steiner inspired. There is a window decoration that keeps coming up, and its so simple and looks so lovely that I thought I'd make one for Goblin's new window. 
All you need in order to do this is tissue paper in 8 different colours (although failing that tissue paper in two or three different colours that can be alternated would work too).  


If like me your tissue paper comes as a rectangle the first thing to do is make it into a square by cutting off the excess. Then fold all the corners of your square into the middle.
 Then take two opposite corners and fold them into the middle to make a kite shape. 
 Repeat for the other 7 colours and then stick them together to form a star.
Finally mount the star on a window. I used tiny blobs of blue tack. I guess double sided sticky tape might also work. 
Fear not if you couldn't follow a word of what I was saying. There is a much better tutorial on GardenMama's blog. You'll also notice she has much nicer scenery out of the window she sticks her star on. 
Related Posts Plugin for WordPress, Blogger...