Showing posts with label halloween. Show all posts

Sunday, 30 October 2011

Halloween Spider

(Goblin is 24 months)
Its Halloween tomorrow so I thought I'd do one last Halloween craft activity - A halloween pompom spider. 
I used an old black t-shirt cut into one long strip by spiralling up from the base. And made a basic pompom. 
I added sticker eyes and pipe cleaner legs with cardboard booties (tucked into the cloth tying the middle of the pompom). And we hung it on our front door with the milk bottle pumpkin
But not before Goblin got to run around the room with it for a while. He likes spiders nearly as much as he likes snails - which is a lot. 

Thursday, 27 October 2011

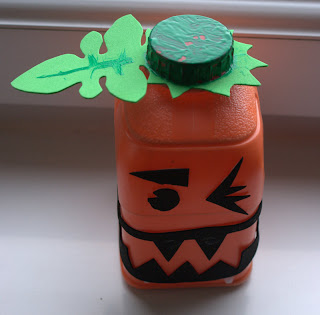
Quick art - Halloween milk bottle pumpkin

(Goblin is 24 months)

Who wants to do a super quick bit of non messy Halloween art with their toddler? 
For this activity you will need :

  • one milk carton (or similar see through squareish shaped bottle)
  • yellow and red paint 
  • PVA glue (optional I think)
  • green and black card, foam or paper

We used a 500ml skimmed milk carton. If I'd used a semi skimmed (green top) I wouldn't have needed to paint the top! You could also use a 4litre for a bigger version of this. 
Squirt a gob of PVA glue, a gob of red paint and about twice as much yellow paint into your carton. I added the glue to ensure the paint stuck to the sides of the carton but I don't know if you really need it. I let Goblin do the squirting and he managed without spills. Then I got him to screw the top on - great fine motor skills practice. 
And its time to shake, shake, shake! You could pop a marble in to add sound. 
I had far too much paint left over in my bottle so I poured it out and I'll use it later for painting.  I took the unscrewed lid and placed it on the green foam (card would work just as well, I just happened to have foam). The paint from inside the cap marked out the width of the neck. I cut out the circle and cut a ring of leaf and stalk decoration around the hole. Then I popped the ring over the neck of the bottle and screwed the cap back on. 
Then I cut out a scary face in black foam and glued it on. I originally saw this idea at My Buddies and I  where they put velcro on the back of the face pieces and on the bottle so the faces could be changed. I think this is a brilliant idea but we didn't have any velcro (I'm still on holiday). So we went with glue. 
I painted the top green and made lines on the leaf. 
I googled images of pumpkins and they are a type of squash so they grow on vine type strings with the leaves on the string rather than on the pumpkin, so my pumpkin is not anatomically correct (just incase you want to use this for educational purposes). 
When the paint dried it looked slightly cracked on the inside of the bottle. But this was a good thing because look at the great effect it has when you shine a torch through the back of the carton. 
If you can find a small enough torch (some led bike lights or head torches will fit through the milk bottle hole) you could actually pop one in the bottle and hang the carton from the handle. I like the idea of hanging one on my door knocker on Monday. 

Thursday, 13 October 2011

Halloween Stain glass window decorations

(Goblin is 24 months)
When you find something that works exploit it I say. Goblin loved ripping up tissue paper when we made our paper mache bowls so I thought what else can we do with tissue paper? 
 I know its a bit early for halloween but I thought I'd make some halloween decorations. I got Goblin to rip up more tissue paper. I laid one sheet of pale coloured tissue paper on a plastic mat and covered it in a mix of PVA glue and water. Then Goblin and I stuck more strips of tissue paper on top, painting over them with the PVA mixture as we went. We only did one or two layers deep. We did one all orange, yellow and red, and the other mixed colours. 
The great thing about this is it doesn't have to be neat, in fact the messier the better.  
We left the tissue paper to dry overnight. It dries very fast and once dry will peal away from the plastic mat with ease. But if you don't have a plastic mat you can cover a tray with cling-film and use that as the base. 

 I drew an outline of a silhouette on some black card, and used a craft knife to cut it out. You can use scissors but then you need to poke holes in the middle to get round the inside. 
 I stuck the silhouette on the tissue paper and cut round that too. 
 And there you have it - Halloween stain glass window decorations. 


Related Posts Plugin for WordPress, Blogger...